

Morpheus
Administrators-
Content count
602 -
Joined
-
Last visited
-
Days Won
101
Posts posted by Morpheus
-
-
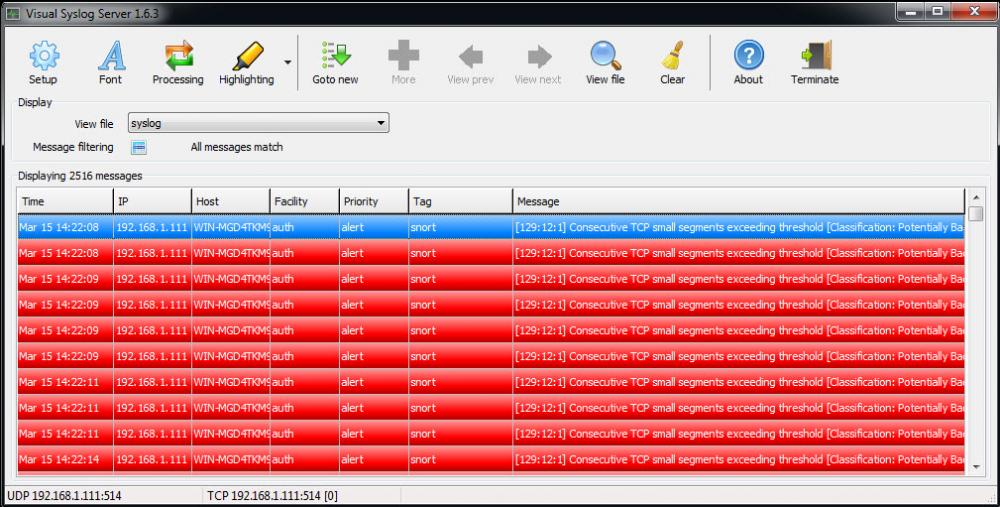
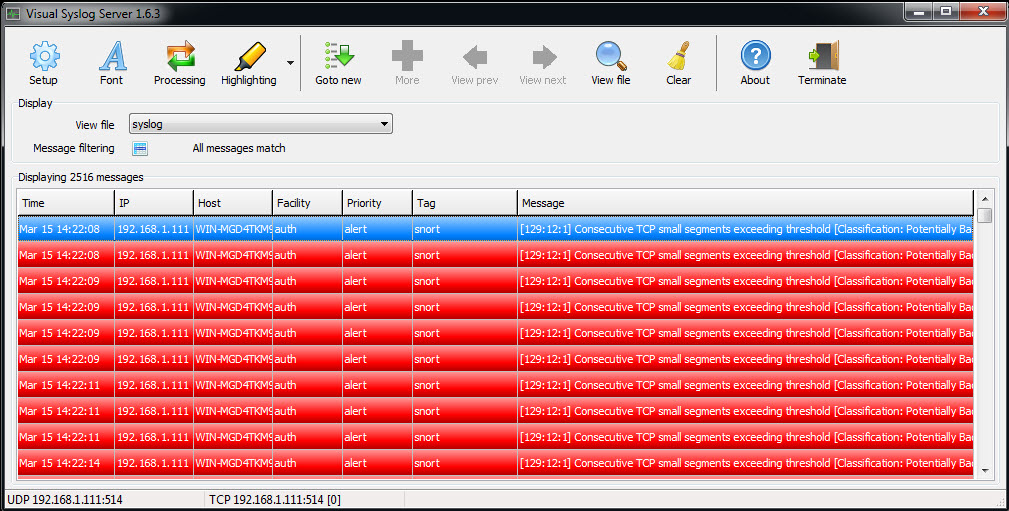
If the High-Volume Logging/Testing option was enabled during the initial Auto-Installer setup, the system likely generated a significant number of events.
While this setting is an excellent diagnostic tool to verify that the Windows Intrusion Detection System (WinIDS) is actively receiving data—especially in environments where default traffic might take hours to trigger an alert—it is recommended to revert to the default policy once connectivity is confirmed.
Procedure to Restore Default Rule Policy
Follow these steps to deactivate the testing rules and return to the standard configuration:
-
Modify Configuration:
-
Navigate to the
Pulledpork\etcfolder via File Explorer. -
Right-click
enablesid.confand open it with Notepad. -
Locate the line beginning with
pcre:. -
Comment out the line by adding a
#at the start (e.g.,# pcre:.) -
Save and exit.
-
-
Clear Temporary Files:
-
Navigate to the
Pulledpork\tempfolder. -
Delete the two files located in this directory.
-
Close File Explorer.
-
-
Update Rule Set:
-
Open the Start Menu and locate and open the WinSnort folder.
-
Run the Rules Updater.
-
This process will fetch the latest rule definitions and reconfigure Snort to the default policy setting, ensuring optimal performance and manageable log volumes.
-
-
You will need to bridge the two NIC's and in Windows 10 do it as below:
Bridging Your Internet Connections on Windows 10
Step 1: Go to your Control Panel from the Start menu.
Step 2: Navigate to Network Connections.
Step 3: Click on the first NIC that you want to bridge.
Step 4: Hold down the CTRL key while clicking on the second NIC that you want to bridge.
Step 5: Right-click on one of the selected NICs and click "Bridge Connections."
I have not tested the above on anything other than Windows 10.
-
To test the MySQL database server and authentications open a CMD window with Administrator access and type d:\activators\db_tools\test_mysql-php7.php
-
The problem is that it is not finding the base.php file, or possibly the base_conf.php file? It has to find the file first before trying to execute it.
Not sure if it could be the problem but make sure the config file is correctly named: base_conf.php
Maybe some sort of a permission problem with the files in the base folder?
Not sure how a permission problem could be the problem when the test.php file is working.
You are going to have issues with WinPcap and Npcap both installed. Use either one but not both.
Note: Uninstall both and then install the one you are going to use. Make sure Snort is not running when you uninstall.
-
Does this work: http://winids/base.php
-
I'm not sur but there appears to be a formatting error with the Apache config. Try the attached one.
Also try moving the test.php file to the base folder and then try http://winids/test.php
-
On 11/25/2019 at 5:22 PM, 7rrivera7 said:It turned out to be permissions to test.php. I had to grant permission to the DefaultAppPool from the top of the INETPUB folder
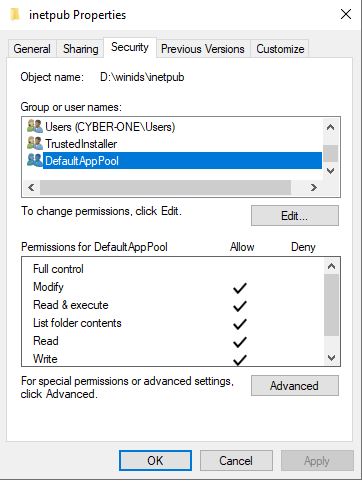
That is not normal?
-
The only thing I can tell is that it's not allowing you to access the test.php because you don't have sufficient permissions?
What happens if you remove the test.php file and try accessing it when it is missing. You should get the same error?
Do you have a space in the word base?
Look at your Physical Path - It appears you have a space in base -> ba se
-
All the files look good. Attached id my config for IIS, try it. You will need to stop IIS, replace the file, and then restart IIS.
-
Go back in and verify the PHP setting in IIS. For some reason the setting sometime does not save and the settings need to be re-applied. No need to reinstall because the same problem could come back.
I checked your setting and the php.ini file is good but the IIS files are for version 10 and I don't have that set of configs to match yours with. I would need to install IIS 10 to get it. What OS version are you running?
-
Go back to the section below and do over.
Configuring IIS for PHP, and the Windows Intrusion Detection Systems security console
If that fails then zip up all the files in the Windows\System32\inetsrv\config folder and attach. Also attach the php.ini file
-
No, you are supposed to enable the lines by removing the # (hash tags).
-
3 hours ago, FDids said:Hi,
Thanks for replying that everything is fixed but:
I apologize for being dense, but I am not sure what to do next to fix my barnyard2 installation so that snort does show exiting. I downloaded the latest Winids Barnyard2 Software Development Pack, winids-b2sdp.zip. Do I unzip it and use the barnyard2.master.zip in place of the other builds? Do I need to start over and redo my installation? Is there another file I should download?
Thanks for all your help!
Bob
No you don't need to do anything. What you are seeing is correct. I made an error in the tutorial and have since corrected it. Check out the tutorial, and it should match your install.
FDids likes this -
-
What is the process you used and I'll check it on another build.
Did you just add the below to your local.rules file?
alert ( msg: "ARPSPOOF_ARP_CACHE_OVERWRITE_ATTACK"; sid: 4; gid: 112; rev: 1; metadata: rule-type preproc ; classtype:bad-unknown; )
Did you use something to generate the alert?
fahmiff likes this -
-
Do as the topic instructs to remove it.
-
-
I have updated the tutorial on installing a local Syslog Server. IT was a major revision and has been tested.
-
On the PC with VSS go to this URL. The IP address will be displayed and populated in the Remote Address dialog box. Just add port 514 to Port Number dialog box, and left-click 'Check'. This will check to make sure the VSS port is open.
If the port is not open then you will need adjust the firewall to allow TCP/UDP traffic for port 514
-
There is already one in the Companion Add-On section..
You might want to try a real free syslog server.
-
Looks like there was a problem with the modder file adding winids to the hosts file.
add to hosts file: 127.0.0.1 winids
fahmiff likes this -
-
There was an issue with the repository being hacked and was taken down. The tutorials were changed in order to internally control that process.
fahmiff likes this
in Technical Advisories - Auto-Installers
Posted
The WinIDS installation includes a Rules Updater utility (located in the WinSnort group in the Start Menu). By default, this utility performs a standard rule sync with Sourcefire and applies updates automatically.
For administrators who require remote monitoring, the utility includes an optional Email Utility. When activated, it sends a status report to a designated email address, confirming whether rules were updated, already current, or if a validation error occurred.
Configuration Procedure
To activate and configure the email notification system, follow these steps:
1. Open the Script for Editing
Navigate to your WinIDS installation directory and locate the PowerShell script:
2. Enable the Mail Utility
Locate the User Configuration section at the top of the script. Change the $sendmail value from 0 to 1:
$sendmail = 1 # Activates the email reporting feature
3. Configure SMTP Settings
Input your mail server details between the quotes in the configuration block:
4. Save and Test
An Email report of the Rules update has been sent...
Troubleshooting & Support
Technical Support:
Issues during setup, please visit the WinSnort.com Forums under the Auto-Installer section for community-led support and troubleshooting tips.